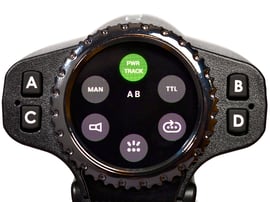
TTL, Manual & PowerTrack mode setup
When using TTL with any strobe brand, only 3 zones will be available, A-C. You can combine TTL with Manual when using Godox/Paul C. Buff/PocketWizard, but TTL will only be available in zones A-C, zone D is Manual only. The LINK is the only Paul C Buff strobe that can do TTL. If combining any strobe brands with Profoto, you will only have TTL. You cannot combine TTL with Manual when using Profoto. TTL is only available when setting Control Mode to Full Control. Click to learn more about Control Mode
Setting up TTL mode for PocketWizard, Paul C. Buff, and Godox
- To set up the Raven for use with TTL, simply tap the letter zone on the touchscreen or tap the zone button to highlight that zone letter.
- When highlighted, that zone will have a white circle around it.
- Once your zone or zones are highlighted, press the Zone Mode Selector
 .
. - Then tap on the TTL icon, and the screen will return to the Zone Control Display.
- Confirm that the zone is in TTL, then you are ready to take pictures
Profoto TTL
When using Profoto in TTL mode, all zones will be TTL. There is no mixing of TTL and Manual at the same time. Profoto performs their TTL in a different method from Godox, Buff or PocketWizard. They use a single preflash for all zones vs. independent metering for each enabled zone. This means that the camera calculates a single lighting brightness and then the Raven divides that up for each zone. This method however requires that all zones be in TTL or all zones in Manual at the same time. You cannot mix modes if Profoto is one of your selected brands.
Setting up Manual lighting
- To begin, make sure the intended zone you want to use has the power level displayed. If that zone is blank, tap on the touchscreen or press the button for that zone for 1 second. Once you see a power value displayed, you are ready to set that zone to Manual
- Next, quickly press the zone button or tap the touchscreen for the zone, or zones, so the letter is highlighted
- Now tap the Zone Mode Selector icon
 in the center of the screen while the zone, or zones, are highlighted
 - Here you will tap on the Manual Mode Icon
 to switch that zone, or zones, to manual control.
 - Then you will be returned to the Zone Control Display and you can now make changes to the power levels.
*Manual mode with power level adjustments is not available when setting Control Mode to Sync Only
Using PowerTracking
PowerTracking is a hybrid flash control mode that automatically adjusts your flash power level based on changes made to your current aperture, ISO, or combination of aperture and ISO. The perfect feature for those pesky cloudy days or needing the right amount of depth of field. No need to adjust your light, the Raven makes it just right.
Setting up PowerTracking
- Start by selecting the zones you want to use for your photoshoot by tapping the touchscreen within that zone and confirm that the zone letter is highlighted. Any zones you have not selected will not have the power levels automatically adjusted by the Raven as you change your ISO and/or Aperture.
- Then tap on the Zone Mode Selector icon

- Next tap on the PWR TRACK icon

- Here you have 3 different options to choose from, Track ISO, Track Aperture, and Track ISO & Aperture. Simply rotate the command ring dial to your selection then tap on ✓
- Now confirm your ISO and Aperture and tap ✓
- You will be returned to the Zone control Display where you will see a blue arrow along the power level bar. You can now adjust the power level to your starting point and let the Raven make automatic adjustments based on your ISO, Aperture, or combination selection
- When you are finished using the PowerTracking feature, tap on the zones using PowerTracking to highlight the zone letters, then tap on the Zone Mode Selector icon

- Now tap on the Manual Mode icon

- This will return you to the Zone Control Display and to full Manual Mode.
- You are now ready to begin taking pictures
*PowerTracking can only be used in Manual Mode, and is not available when setting Control Mode to Sync Only. Click to learn more about Control Mode

